Pages

Tuesday, October 29, 2013

Trick-or-Treating tips for #kids {#allergy #Galactosemia} #halloween

Mia Rose carving her Jack-O-Lantern
Can you believe that it is almost Halloween Eve?!  Alena and Mia Rose have been counting down the days; we decorated the house and yard right on time - you know that is October 1st - visited the pumpkin patch and started to carve our Jack-O-Lanterns a couple of days ago.  Dinner for Halloween is planned, costumes are ready, and candy for handing out is bought as well.  I guess you can say we are prepared...

Here is a question that has was on my mind when our girls where not old enough to go trick-or treating.  How will that work?  Will they be sad if they cannot eat the candy?  Or will we just not allow them to go?  {Yes, I honestly entertained that question once for about 10 seconds...what on earth was I thinking?!}
Alena carving her Jack-O-Lantern
The first time year we took Alena trick-or-treating we went to the Kennedy School for an indoor trick-or-treat event.  She was so excited and at the time we allowed her to only take "safe" candy {you know Skittles, Twizlers, etc.} - I have to admit to some minor heavy heartedness at the time but these times have passed.

When trick-or-treating the girls always pick a piece of candy even if there are only "unsafe treats"; they are - of course - super excited about the houses that have safe treats, or special treats just for them...At home each girl empties her treat bag onto the table and they separate by safe/unsafe treats.  Next we exchange the unsafe candy for safe candy.  I always buy a bag of "safe" candy which we keep at home for this purpose only.  This year, I am thinking that we will also exchange some candy for nickels...you know because how much candy does one really need, right?!

Now here are Alena's & Mia Rose's tips for a fun Trick-or Treating  -

- See if there is a piece of candy that is safe, if not
- are there other treats like pencils, erasers, tattoos, if not
- choose the piece of candy that is the prettiest .
- Have lots of fun!!!

Now here is how it happened in the past....


Monday, October 28, 2013

Savory Corn Cakes {#Dairyfree} #CookbookSpotlight #TheNewSouthwest #Giveaway

This post is part of The New Southwest Cookbook Spotlight sponsored by Hippocrene and hosted at girlichef.

It has been fantastic to be part of this event hosted by my friend Heather a.k.a. girlichef.  I must tell you that my entire family has enjoyed the event and  The New Southwest by Meagan Miccozi a lot.  It has been an entirely new culinary experience for this German girl :) 
The event kicked-off with Mushroom + Leek Migas, for bloggers choice last week I made Chicken Tinga Potpie, and today it is a dairy free version of the Savory Corn Cakes on page 139.   This truly is amazing cookbook, it is actually the first time that I have found Ron read through a cookbook plus  The New Southwest exposes us to so many new flavors. In addition, if you are like us and need to avoid dairy many of the recipes are easily adaptable and still delicious just like the Savory Corn Cakes 


Savory Corn Cakes pages 139, The New Southwest  by Meagan Miccozi
  • 1 C all purpose flour
  • 1 tsp baking powder
  • 1 tsp salt
  • 3/4 C whole milk {plain Almond Milk or your favorite plain non-dairy beverage}
  • 1/2 C sour cream {my preferred brand is Tofutti vegan sour cream}
  • 1 large egg
  • 2-1/2 C canned or cooked fresh whole corn kernels
  • 1 C diced green onions
  • Vegetable Oil for frying
Yield: 12 to 14 corn cakes

Whisk the flour, baking powder, and salt together in a large bowl.

In a separate bowl, whisk milk, sour cream, and egg together.  Whisk the wet ingredients into the dry ingredients, mixing just until you have a smooth, uniform batter.  Fold in the corn and green onions.

Heat 1 tablespoon oil in a heavy bottomed skillet over medium heat (assuming you will be frying these corn cakes in batches, I recommend adding approximately 1 tablespoon of oil to your pan before cooking each batch). Using 1/4- cup measure, portion out 3 or 4 corn cakes into the skillet.  Fry corn cakes for approximately 3 minutes on the first side, until air holes appear across the top of each corn cake, and their shapes are set and matte colored.  Flip and cook 3 to 4 more minutes, until corn cakes are cooked through.  Serve immediately.  Continue cooking batches of corn cakes until the batter is used.

They were so delicious for our breakfast, and afternoon snack.  I know that you just want to have your own copy of The New Southwest . Here is your chance to win your own copy...

How to enter this contest
1. Mandatory Entry: Leave a comment on this blog post letting me know what your favorite Southwestern dish is.
2. Tons of optional entries in rafflecopter widget.
Hippocrene will be supplying 14 copies of The New Southwest by Meagan Micozzi for this giveaway, in conjunction with The New Southwest Cookbook Spotlight.  Contest is open to anybody with a shipping address in the USA.  Submissions will be accepted via the rafflecopter widget through 11:59 pm ET on Sunday, November 3, 2013.  Fourteen winners will be chosen by random draw, verified, and be notified by email (from Heather at girlichef) within 48 hours of the close of this contest.  The winner should respond within 24 hours of notification, or a new winner will be drawn in their place.  Good Luck!

a Rafflecopter giveaway

Disclaimer: I received a copy of The New Southwest for participating in this Cookbook Spotlight.  All opinions are my own and no monetary value was exchanged. 
This post contains affiliate links.

Thursday, October 24, 2013

Chicken Tinga Potpie #CookbookSpotlight #TheNewSouthwest {#dairyfree}

This post is part of The New Southwest Cookbook Spotlight sponsored by Hippocrene and hosted at girlichef.

I am so excited to be part of this fantastic event hosted by my friend Heather a.k.a. girlichef; the cookbook in the Spotlight is The New Southwest by Meagan Miccozi. There are a total of three events or you know, three weeks.  For the first event girlichef chose Mushroom + Leek Migas for everyone to make. Let's be frank it was a recipe I was not so sure but let me tell you...it was absolutely amazing.  Yes, it was so good that I made it again for breakfast last Sunday.  Now let's talk about this week; The New Southwest is an absolutely beautiful cookbook and it is loaded with dishes I want to try.  So what did I choose for this week's bloggers choice?!  Yes I know - you know it says so in the title; Chicken Tinga Potpie on page 159.  Flavorful chicken underneath a sheet of deliciously flaky crust; oh yes.  Potpie is something I rarely - as in maybe once every couple of years - make and It is a dish that Ron loves.  So it is perfect, right?!  Potpie with a twist from The New Southwest :)

Let me tell you, this dish was just as good as the Mushroom + Leek Migas and an absolute hit in our house.  Both girls claimed that they only liked the crust, but strangely enough Mia Rose took seconds and Alena's plate was cleaned; plus they took the rest for lunch to school and the thermoses came back empty.  Hmmmmmmm...it is a sure sign that they loved this dish just as much as Ron and I did :)

Here it is...

Chicken Tinga Potpie - pge 159 The New Southwest by Meagan Micozzi
my adaptions are listed at the end underneath the recipe ^^^
For the crust:
  • 1-1/2 cups all-purpose flour
  • 1 teaspoon salt
  • 3/4 cups unsalted butter, chilled and cubed 
  • 3 tablespoons cold water
  • 1 large egg, lightly beaten
  • For the filing:
  • 2 pounds boneless, skinless chicken breasts
  • 2 cups chicken stock
  • 2 bay leaves
  • 3 tablespoons extra virgin olive oil
  • 1 cup diced green bell pepper
  • 1 cup chopped tomatillos
  • 3 cups chopped plum (Roma) tomatoes
  • 2 teaspoons minced fresh garlic
  • 2 teaspoons fresh thyme
  • 2 teaspoons fresh marjoram
  • 1-1/2 teaspoons salt, plus more for seasoning to taste if necessary 
  • 1-1/2 teaspoons black pepper, plus more for seasoning to taste if necessary
To prepare the crust, place the flour and salt in the bowl of a food processors fitted with a steel blade and pulse process just to blend.  Add the butter and process to a coarse meal.  With the motor still running, add the water through the feed tube and continue to process just until the dough comes together into a solid mass.  Remove dough, form into a large disk, and set aside to rest.  If preparing the dough in advance, wrap tightly in wax or parchment paper and store in the refrigerator for up to one day   Be sure to allow the dough to come to room temperature and soften slightly before rolling out.
To prepare the chicken, place chicken, stock, bay leaves, and 2 cups water in a large heavy-bottomed stockpot or Dutch oven and bring to a boil (be sure to select a vessel that allows the liquid to cover the chicken completely).  Reduce to a simmer and cook for approximately 20 minutes or until the chicken is cooked through and fork-tender.  Drain and cube the chicken into 2-inch pieces once cool enough to handle.
To prepare the sauce, heat olive oil in a large, heavy bottomed pan over medium heat, add onions and bell pepper and sauté for 10 minutes.  Add tomatillo and tomato pieces and stock for an additional 10 minutes.  Lower heat to a simmer.  Add the garlic, thyme, marjoram, salt, and black pepper and simmer for 10 final minutes.  Stir cooked chicken pieces into the sauce and pour into a 9x13 inch baking pan.

Once you are ready to bake your potpie, preheat the oven to 400F.  Use a well-floured rolling pin to roll the dough out into an oblong shape with a thickness of approximately 1/4 inch.  I recommend rolling the dough out on a piece of parchment paper which you can then invert and carefully drape over the top of your filled baking pan, peeling away and discarding the paper once the dough is in place.  Don't worry if your dough hangs of the edges of your pan in spots.  Brush the surface of the dough with the beaten egg and lightly prick it several times with a fork to allow steam to vent.

Place your assembled pie onto a baking sheet and bake for approximately 45 minutes, or until the crust is golden brown at the edges and the filling is bubbling.  Remove and serve immediately.

YIELD: approximately 4 servings
^^^  to make dairy free use vegan "butter" instead of butter; my preferred brand is Earth Balance
^^^  I used 2 tsp dried Herbs de Provence in lieu of the fresh thyme and marjoram

Disclaimer: I received a copy of The New Southwest for participating in this Cookbook Spotlight.  All opinions are my own and no monetary value was exchanged. 
This post contains affiliate links.

Tuesday, October 22, 2013

#Dairyfree Chicken Enchiladas for #WeekdaySupper

Sunday Supper MovementIs it not great that #SundaySupper has expanded to #WeekdaySupper? Are you like me and also always on the lookout for new, quick and easy recipes for the busy weeknights? Yes? So this week as the temperatures - at least in the Northern Hemisphere - get cooler we bring you Quick Comfort Foods.  Yes, that is right five delicious, easy and quick to make comforting meals for the busy week.

I bring you quick and easy Chicken Enchiladas {dairyfree} ~ this is such an easy dish and wonderful way to use leftover chicken from a Roasted Chicken; if you do not have leftover chicken and/or no time to make one?  No problem, just pick-up a rotisserie chicken.  It will be dinner one night, and - at least in my house - there is still plenty leftover for Chicken Enchiladas the next day.  Use canned beans, or if you have the time cook up a batch of black beans but really black beans work just as well plus it is a big time saver....

This is delicious; the entire family loves this meal even the bean hating 7 year old and the chicken hating 9 year old - yup that is right all four of us give it a thumbs up :) 

Take a look


Dairyfree Chicken Enchiladas
  • Splash of olive oil
  • 1 onion diced
  • 1-2 garlic cloves minced
  • 1 tsp. Spice Hunter Chili Powder Blend
  • 1/4 tsp. cumin
  • 1/4 tsp. coriander
  • 1 tsp. salt
  • 2 cans black beans drained, and rinsed
  • app. 1-1/2 C of cubed, cooked chicken
  • 1 Pack Daiya Cheddar Style Vegan Shreds
  • 2 cans Hatch Encilada Sauce
  • 1 Pack of Flour Tortillas (I used about 10)
  1. Heat olive oil in a pan, and add onions with a pinch of salt when hot.
  2. Saute onions until soft, then add garlic and all of the spices. When fragrant add beans and keep on the stove for another minute or so.
  3. Place chicken in a large bowl, add onion/bean mixture, and about 1/3 of the Daiya Shreds. Mix it well (I just use my hands).
  4. Pour one can of Enchilada Sauce into a large baking dish, and preheat oven to 350 F
  5. Taking one Tortilla at a time, scoop the chicken/bean mixture into it, roll it up and place it in the baking dish.  Repeat until you used up all of the chicken/bean mixture.
  6. When done, pour the second can of Enchilada Sauce over the rolled up tortillas, top with the rest of the Daiya Shreads.  Bake for at least 30 minutes, or until bubbly hot.

Sunday, October 20, 2013

Creamy #Dairyfree Mushroom Sauce for #SundaySupper {#Vegan}

Happy Sunday and welcome to another great, fantastic, and fabulous #SundaySupper!  This weeks theme is "sauce" - yes, that is right sauces in all varieties.  I do not know about you, but we love sauces.  Actually when I was younger - okay a lot younger - I declared to my Mom that I could live on Spätzle, Sauce, and Salad.  Yup, that is right - there is just something so satisfying about a delicious sauce.  Our host today is DB a.k.a. Crazy Foodie Stunts - thank you so much for hosting.  

You may, or may not know this but sauces are often a little bit more challenging for our kids.  Many of the sauces in restaurants contain either butter - which is never allowed - or some other kind of milk ingredient that the girls cannot metabolize.  But you know - as I said - we all love sauces so just as you make lemonade with lemons, I make delicious creamy sauce with the "safe" items.  Now don't you wrinkle your nose because - believe me - this sauce is so good you will never miss the cow :)


Creamy Dairyfree Mushroom Sauce
  • Splash of olive oil
  • 1 small onion diced
  • 4 oz crimini mushrooms, cleaned and slice thinly
  • 3 sprigs of fresh type
  • 1 Tbs flour
  • 6 Tbs white wine
  • 2 C soy creamer {I prefer Wildwood brand}
  • 1 tbs. lemon juice
  • zest of 1/2 untreated lemon
  • 1 Tbs Vegan sour cream {I prefer Tofutti}
  • Salt & Pepper to taste
  1. Heat olive oil in a pan and when hot add the onions with a pinch of salt.  When onions start to soften,
  2. Add mushrooms together with thyme and sauté until everything is fragrant.
  3. Carefully sprinkle 1 Tbs of flour over the veggie mixture; stir carefully to eliminate any lumps. When fully incorporated,
  4. Add Soy Creamer - stir carefully to eliminate any lumps bring to a slow simmer.  When the sauce  thickens to your liking,
  5. Add lemon juice together with the zest as well as the Vegan sour cream.  Mix well into the sauce and give it another couple of minutes or so for the flavors to combine.
  6. Add salt and pepper to taste and the sauce is ready.
What to serve it on?  There are so many options;  this time I served the sauce over

- pasta together with about 3 cups of Lacinato Kale {vegan}

or

- serve the sauce over pork loin, pork chop, etc.
- serve it along side a Schnitzel
- serve it with fish
- for a vegan treat with a Germanic flavor serve it over pan friend tofu
- serve it with Spätzle, and a big salad

Let me know how you enjoy it :) 

Now are you ready for more amazing sauces?  There are savory as well as sweet dessert sauces; be sure to check out this amazing line-up friends and join us for our chat.

Savory Sauces
Pasta Sauces and Pastas with Sauce
Entreés with Sauces
Sweet Sauces
Desserts with Sauces
Join the #SundaySupper conversation on twitter each Sunday. We tweet throughout the day and share recipes from all over the world. Our weekly chat starts at 7:00 pm EST. Follow the #SundaySupper hashtag and remember to include it in your tweets to join in the chat. Check out our #SundaySupper Pinterest board for more fabulous recipes and food photos.

Would you like to join the Sunday Supper Movement? It’s easy. You can sign up by clicking here → Sunday Supper Movement.

Friday, October 18, 2013

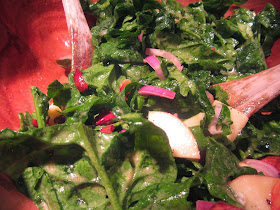
Spinach - Apple salad with toasted Almonds

Yesterday we received beautiful spinach with our weekly CSA share plus we are having the apple best apple harvest ever {from Alena's apple tree} so why not use both together in a perfect salad...it was so good and the picture does not give it justice...

Spinach - Apple Salad with toasted Almonds - adapted from recipe by New Seasons Market

  • 3/4 lb fresh spinach, washed and torn into pieces
  • 1 large apple cut into small cubes
  • 1/2 sliced red onion
  • 1/2 cup toasted almonds coarsely chopped {I toasted mine in the oven at 350 for about 1/2 hr}
  • 6 Tbs Olive Oil 
  • 4 Tbs Cider Vinegar {or more to taste}
  • 1 Tbs Dijon mustard
  • 2 Tbs Maple Syrup
  • Salt & Pepper to taste
  1. In a salad bowl combine olive oil with vinegar, then slowly
  2. add the mustard and combine well
  3. add Maple Syrup, salt as well as pepper.  Adjust flavors according to taste
  4. When about ready to serve 
  5. add spinach, onion slices, apple together with almonds to the salad bowl.  Toss with the dressing until all is dressed.
Enjoy!

Thursday, October 17, 2013

Pumpkin Patch #Fun in #Oregon

It seems that all my posts are written in my head lately and do not make to the keyboard....but now finally :)

I love fall - as I do all other seasons - but one of my favorite things about it is all the beautiful colors and especially orange.  The color orange just makes me happy;  this girl may have gotten herself an orange purse on vacation - so yes, orange is the color that makes me happy and to me there is nothing quite like a field of pumpkins basting in the sun.  So pretty - and yes, we all love, love, love to go to the Pumpkin Patch.

The visit to the Pumpkin Patch is special and something we do at least once every October; growing up in Germany we did not celebrate Halloween and pumpkins were something I saw occasionally on the market - so let's just say that I have fully embraced this wonderful American tradition.  You may remember that my sister Kati was visiting us and you know what?  She had never been to a Pumpkin Patch either - so there was really no question about what were going to do :)  Yes...Pumpkin Patch - this year we went out to Rasmussen Farms in Hood River {in the beautiful Columbia River Gorge}.  The Pumpkin Patch on Sauvie Island is our usual spot - but it had been raining so hard that we imagined the fields being way too muddy {yes, there is such a thing :)}.   Let me tell you, it was worth the drive - take a look....

Plus not only is there a wonderful themed corn maze, but also pumpkin fun land and the most amazing views of Mt. Adams as well as Mt. Hood. Let me just say that we had so much fun....
...now you know that there will be a post on making Jack-O Lantern's out of our beautiful pumpkins, right?! Stay tuned...

Tuesday, October 15, 2013

Mushroom + Leek Migas {The New Southwest - #CookbookSpotlight } {#dairyfree}

This post is part of The New Southwest Cookbook Spotlight sponsored by Hippocrene and hosted at girlichef.

I am so excited to be part of this fantastic event hosted by my friend Heather a.k.a. girlichef; the cookbook in the Spotlight is The New Southwest by Meagan Miccozi.  The cookbook takes us on a culinary trip to the food and flavor of the Southwest.  Something I am very excited about because - truth be said - I do not know very much about this cuisine, but after trying Mushroom & Leek Migas I absolutely fell in love.  I cannot wait to see more...

This dish was an absolute hit; I did adjust it to our dietary needs i.e. replaced the dairy with "safe" items and it was amazing.  It is actually a pretty big deal because neither of my girls are big on eggs, but they could not get enough of this dish.  Take a look how beautiful it is


Mushroom & Leek Migas (The New Southwest by Meagan Micozzi p. 60)  yield: approximately 4 to 6 servings  {*Note: adaption to make this dish dairyfree are in brackets marked with "*"}
  • 4 (5-inch) corn tortillas
  • 1-1/4 cups vegetable oil, divided
  • 10 large eggs
  • salt to taste
  • freshly ground black pepper to taste
  • 1/4 cup heavy cream {* Wildwood Brand Soy Creamer}
  • 8 ounces brown baby bella crimini mushrooms, brushed clean, sliced (approximately 2-1/2 cups)
  • 1 leek, ends removed, chopped
  • 2 tablespoons minced fresh garlic
  • 1 cup shredded Manchego cheese {*Daiya Mozzarella shreds-or leave out^^^}
To prepare the corn strips, cut the tortillas in half and then slice them into thin strips (1/2-inch to 3/4-inch wide). Heat 1 cup of the vegetable oil in a large, heavy-bottomed saute pan over medium-high heat. Working in batches, fry the tortilla strips for 1 to 2 minutes, flipping the pieces as they fry and removing the crispy, browned strips to a paper towel-lined baking sheet to drain and cool.
Whisk the eggs and heavy cream together in a large bowl and season liberally with salt and pepper. Set aside.
Rinse out the pan used for the tortilla strips and warm the remaining 1/4 cup oil over medium heat. Saute the mushroom slices for approximately 3 minutes or until tender and fragrant. Add the leek and saute for an additional 2 minutes. Add the garlic and saute for 1 more minute. Pour in the egg mixture and cook, stirring constantly in a circular motion until eggs begin to solidify. Just as the eggs are beginning to solidify, stir in the fried tortilla strips. Continue cooking, stirring frequently, until eggs are light, fluffy, and cooked through.
Remove from the heat, top with the cheese, and serve immediately.

^^^ We used Gruyere - one of the "allowed" cheeses for our girls & "approved" by their dietician :)


Disclaimer: I received a copy of The New Southwest for participating in this Cookbook Spotlight.  All opinions are my own and no monetary value was exchanged. 
This post contains affiliate links. 


Sunday, October 13, 2013

Herbed Pork Loin on Spätzle #SundaySupper #FamilyDinnerTable

AmFam Back To The Family Dinnertable Logo
Happy Sunday!!!  I am so excited to be participating in another event sponsored by American Family Insurance and the quest to Bring back the Family Dinner Table.  This is right in line with #SundaySupper mission to bring back mealtime around the family table.  It is something that rings true to me; it is without question that we eat dinner at the table together every night. 

Big Sunday Supper Meals that make leftovers to re-invented for Weekday Supper is the theme this week; another fantastic theme as Sunday is the day to make that big meal for everyone around the Family Dinner Table.  Our meals on Sunday are generally bigger, and I make sure to have enough leftovers for lunch on Monday, well at least for the girls lunch. Besides lunch we are not big leftover eaters; the same meal for twice in a row for dinner is just not appealing to me but leftovers re-invented into another dish?  Now you are talking...because we are talking about a different dish.  It is something I do frequently as I love to reinvent the side of Sunday into a new dish for Weekday Supper.  For example mashed or {s}mashed potatoes is such a side; I make quite a bit more and then during the week it will turn into a wonderfully, filling potato soup; leftover pasta will turn into a pan of  savory onion-greens-pasta; and if there is leftover ham along with the past it will turn into a savory dish of ham-tomato/or other veggie-pasta .  The key is to make enough of a dish that all love and easily turns into another easy Weekday Supper.  So today l bring one of our favorites; Herbed Pork Loin on Spätzle.  Can you guess what will be used for the re-invention?  If you decided on Spätzle you are correct; yes, leftover herbed pork loin is delicious but oh my, the options with Spaetzle.  Käsespätzle, or Spätzle in savory soup {I am thinking lentil}, or just fried up with onion, some bacon, greens, topped with some Gruyere and served with a big salad.  Oh yes...and the great thing is that you can also freeze Spätzle plus the recipe and easily be increased.  So now, are you ready for this delicious, easy, Big Sunday Supper Meal served at our virtual Family Table? Here it is...

Herbed Pork Loin on Spätzle

Herbed Pork Loin
    Sunday Supper Movement
  • 2 medium sized pork loins
  • Salt & Pepper
  • 1/2 C fresh rosemary {pulled off the stems and chopped}
  • 1/2 C fresh thyme stemmed {pulled of the stems and chopped}
  • 1 Tbs Dijon Mustard
  • 3 slices of thick cut bacon
  • 1 C white wine
  • Butcher twine
*** Preheat oven to 375F 

1.  Liberally rub pork loins with salt and pepper
2.  Slather each pork loin with dijon mustard
3.  Roll each pork loin in the herb mixture; to cover the entire meat
4.  Lay out the bacon slices and place one of the pork loins on top of it.  Wrap the bacon around the  pork loin and when done secure the bacon around the pork loin with butcher twine
5.  Heat a large - I use cast iron - pan and carefully brown each pork loin from each side {brown one
     pork loin at a time}
6. When both pork loins are browned, place them into a shallow baking dish
7.  Add 1 C of white wine to the pan used to brown the meat; be sure to stir up all the delicious bits   
     from the bottom of the pan. Bring to a boil, add a cup of water, or broth.
8. Pour the liquid into the baking dish
9. Bake pork loin in oven until internal temperature of the pork loin reaches 145 F.  Be sure not to over
    cook. {it takes about 30-40 minutes}

Spätzle*
  • 500 gr. flour (app. 2-3/4 C) 
  •     5 eggs
  • 125 ml water, and 125 ml sparkling water {it is ok to just use plain water} Total = 1 C + 1 Tb.
  • 1 Tb salt
****it is very easy to increase/decrease this recipe -> 5 eggs = 500 gr flour & 250 ml water;  3 eggs = 
        300 gr. four & 150 ml water, 10 eggs = 1,000 gr flour & 500 ml water etc.***
  1. Combine flour with salt.
  2. Add the eggs, one by one {my sister swears by the wooden spoon to mix the Spätzle dough}
  3. Slowly add the water; stir dough the entire time
  4. Continue to stir the Spätzle dough until you have worked out any flour lumps, and it falls heavy of the spoon
  5. Bring a large pot of water with a generous pinch of salt to a boil
  6. Once water is boiling, place dough {working in batches} in the Spätzle press, or push through a colander
  7. Remove Spätzle from the water as soon as they rise to the top of the water; set them aside until ready to eat or place portion reserved for your Weekday recipe in fridge or freezer
When ready to serve, slice the Herbed Pork Loin and serve on top of the Spätzle; serve with a large side salad.

Do you have a favorite family recipe you are ready to share? Get ready to share it with American Family Insurance as they are having  a "Share Your Recipe" sweepstakes for 6 weeks.  The weekly prize is a $100 Williams-Sonoma gift card plus a grand prize of a $500 Williams-Sonoma gift card.  For details please visit American Family Insurance

Find American Family Insurance - on Pinterest, FacebookTwitterGoogle+LinkedIn, and YouTube

There are a total of 20 #SundaySupper contributors participating in this fantastic event sponsored by American Family Insurance; take a look at all of these amazing recipes...

Join the #SundaySupper conversation on twitter each Sunday. We tweet throughout the day and share recipes from all over the world. Our weekly chat starts at 7:00 pm EST. Follow the #SundaySupper hashtag and remember to include it in your tweets to join in the chat. Check out our #SundaySupper Pinterest board for more fabulous recipes and food photos. Would you like to join the Sunday Supper Movement? It’s easy. You can sign up by clicking here → Sunday Supper Movement.


This post is sponsored by American Family Insurance.  All opinions expressed in this post are my own.


Sunday, October 6, 2013

Pepper Beef Stew for #SundaySupper

Happy Sunday!!! Does it feel like fall yet where you live?  Well, we have had some very stormy weather here in Portland with record rains and it has felt more like winter than fall.  Just the perfect type of weather for comfort food and this week's #SundaySupper theme is just perfect.  It is One Pot Recipes and hosted by the wonderful Amy who is the wonderful blogger known as kimchi MOM. Thank you so much for hosting :)

How do you feel about meals that are prepared in just one pot?  I just love them - they are perfect as in not only that there is also just one pot to clean, but also because once everything is put together and on the stove/slow cooker no additional cooking is needed.  Well, okay maybe a side salad but that is it at least for me :)

So today I bring a hearty Pepper Beef Stew; full of succulent Italian sweet peppers, beef and rice.  True comfort in a bowl and the entire family enjoyed this dish....

Here it is...

Pepper Beef Stew
  • 2 lbs. beef stew {cubed}
  • 2 Tbs flour
  • pepper & paprika {generous}
  • 1 Tbs Herbs de Provence
  • splash of Olive Oil
  • 1 lb. sweet peppers {I used orange & red}; sliced
  • 1 large onion, sliced
  • 1 quart beef broth {I use Pacific brand}
  • Salt
  • 1-1/2 Tbs Balsamico Vinegar
  • 1-1/2 C white rice
  • 2 C spinach washed and roughly chopped
***Preheat oven to 375 F
  1. Mix flour with generous amount of pepper, paprika, and Herbs de Provence,
  2. Mix the beef with the flour mixture until all is covered, reserve any flour mixture not used
  3. Heat olive oil in a large pot that can transfer to the oven and when hot
  4. Add beef and brown from all sides.  Be sure not to crowd the pot; remove and reserve when browned.  Repeat until all beef is browned - Set browned meat aside, then
  5. Add onions; sauté for a couple of minutes until they begin to soften then
  6. Add peppers and sauté for another couple of minutes until fragrant.  Be sure not to burn the vegetables; when onions are translucent and peppers are slightly soft,
  7. Return browned beef to the pot as well as any of remaining flour mixture.  Stir beef under the vegetables then
  8. Add beef broth.
  9. Bring to a boil, cover and place the pot into the oven. Cook covered in oven for about 30 minutes before adding salt together with 1-1/2 Tbs of Balsamico.  Cover and cook for another 10 minutes
  10. Add rice and cook for another 25 - 30 minutes  Check on the rice after about 20 minutes and remove from the oven once rice is cooked through.  NOTE:  We like a lot of rice and a very thick stew; for a lighter stew reduce the amount of rice.
  11. Remove pot from the oven - top with the fresh roughly chopped spinach and cover pot.  The dish is ready for serving after another couple of minutes and when the spinach has slightly wilted.
Sunday Supper MovementI hope you enjoy this stew as much as we did :)  - Now be sure to check out all the other fantastic One Pot Recipes the rest of the #SundaySupper contributors are bringing to the table.   You surely will find at least a couple that you must try...

“Take the chill off” Chilis, Soups, and Starters

“Put meat on your bones” Stews

“Make room for seconds” Main Dishes

“Can’t say no” Desserts

Join the #SundaySupper conversation on twitter each Sunday. We tweet throughout the day and share recipes from all over the world. Our weekly chat starts at 7:00 pm EST. Follow the #SundaySupper hashtag and remember to include it in your tweets to join in the chat. Check out our #SundaySupper Pinterest board for more fabulous recipes and food photos. Would you like to join the Sunday Supper Movement? It’s easy. You can sign up by clicking here → Sunday Supper Movement.